Entering expenses
Managing expenses and travel expenses in Vertec
Operating mode
Modules
Services & Expenses
Note: We have an additional feature for Germany specifically for billing travel expenses. This is available by importing the relevant config set. Learn further details and how to download the config set in Travel expenses Germany.
Entering expenses
On the user, you can access the list for entering expenses via Expenses.
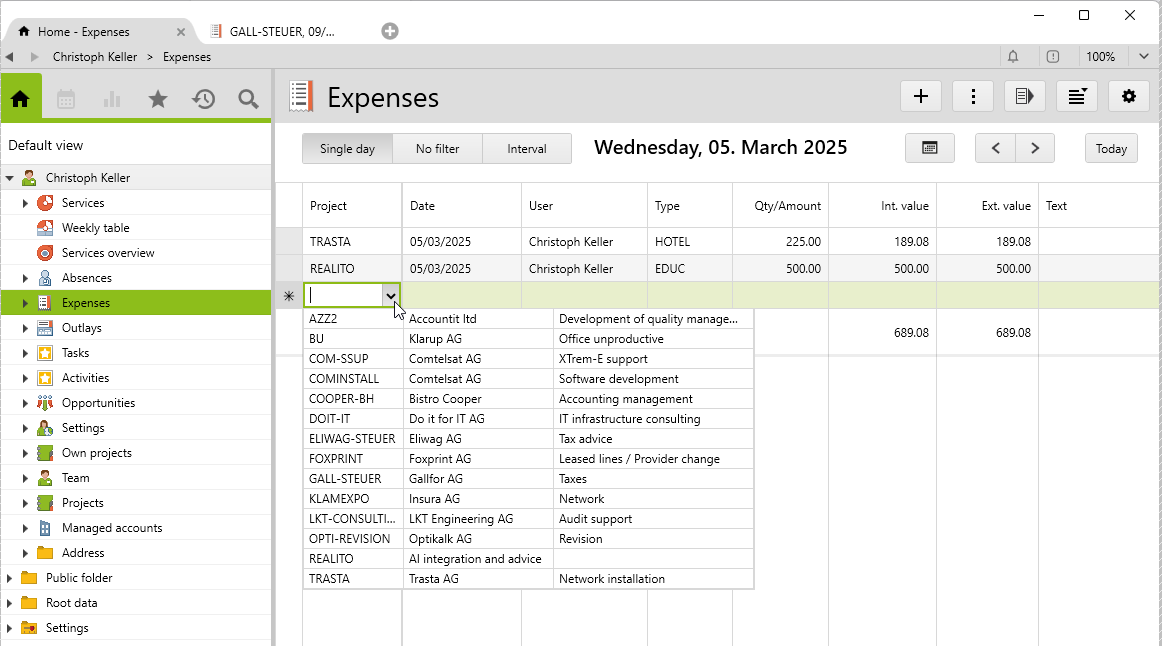
Detailed entry in a single window
To enter detailed expenses, a new expense entry can be opened by right-clicking on the folder Expenses or by via the New Menu (+). The following window appears:

Using selection fields, you can directly assign the expense to the required project and optionally to a phase. By selecting an expense type, the relevant default settings (margin/unit price/gross/reimbursed) are entered. Certain information such as today’s date, the registered user and the price per unit stored on the expense type are entered automatically. Thus, you only have to enter the required amount.
| Settings | Description |
|---|---|
Margin or price |
There are two options for price calculation: margin or price. 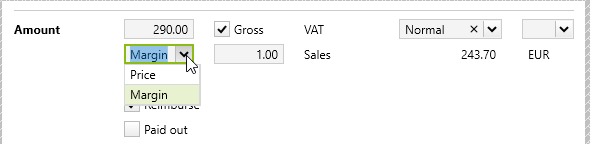 MarginThe price calculation can be done by specifying a margin (as a factor). For example, if you want to hit a 5% margin on a price, specify 1.05 for margin. The Amount field specifies the actual purchase value. The amounts are calculated based on the margin. A margin can be predefined on the expense type. If a margin is specified, expenses entered on these types are calculated using the margin system. When allocating expense types to phases, the margins can be overwritten. These margins then apply to expenses and outlays that are entered for these phases. Gross checkbox: The checkbox indicates whether the amount is to be interpreted as gross or net. The margin is a factor that is always applied to the net value. Therefore, gross procurement is also possible with different VAT rates for procurement and sale.  PriceThis calculation works according to the system of 5 units (quantity) at 15 francs (sales price) = 75 francs. For example, the purchase price is CHF 10.00 and the sales price is CHF 15.00. The amounts are calculated on the basis of these prices. Gross checkbox: This defines whether the price is to be interpreted as gross or net. The default value that a new expense assumes for the Gross field can be specified on the expense types (e.g., kilometers are always entered net, train tickets are gross). Because the purchase value is explicitly stated, there is a problem with the sales price calculation if the expenses are gross and the purchasing VAT is not equal to the sales VAT. In this case, the selling price is calculated on the basis of the gross purchase price, instead of the net price. 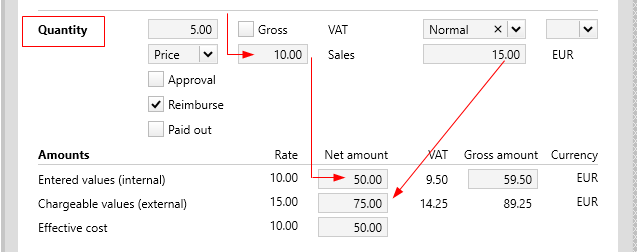 |
Entry currency |
When entering expenses, the Entry currency of the user applies. If the user has explicitly set a currency, it is used if it differs from the key currency. Otherwise, the project currency is automatically applied to the expense. A different currency can be assigned via the selection field, whereby the amount in the project currency is calculated from the saved exchange rate. 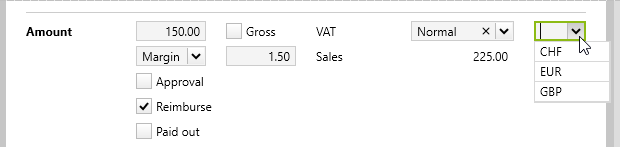 |
Approval checkbox |
You can control whether this option is taken into account on the individual expenses via the system settings Expenses must be approved. If so, only approved expenses can appear on an invoice. In this case, this option must be set for expenses that are to be charged onward. |
Reimbursed & Paid out checkbox |
If this option is activated, the entered expenses are automatically marked as refundable to the employee. The price paid out to the employee is calculated from the internal value plus the purchasing VAT. This option can also be defined on the expense type. On an individual user or on a list of users, you can print a list of the expenses to be refunded within a specified date interval for each employee via the Print menu > Expenses to reimburse by type. Via config set, you can also import the report Expenses to reimburse with attachment. Once all these expenses have been paid out, they must be marked as paid out. Then they no longer appear on the above list. |
Amounts |
When you enter Quantity/Amount, the different amounts for internal, external, cost and VAT values are automatically calculated using the rates and the Gross checkbox. Vertec also allows the individual amounts to be entered directly. The amounts entered directly appear in green and are no longer affected by “quantity/amount”. All other amounts are calculated, if possible, on the basis of those entered directly, taking into account the amounts entered.  Internal value vs. costUsually, the internal value and the cost value are the same. The cost value differs from the internal value only if you want to add an overhead surcharge to the price paid for the expense as part of cost accounting. In this case, a cost value is stored on the expense type, which then determines the costs on the expense. Adjust amounts for charged expensesThe purchasing VAT as well as the internal values can still be adjusted after charging. This is because they can still change, e.g. when paying out to the employee. If the expenses are part of a posted creditor entry, they can no longer be changed. |
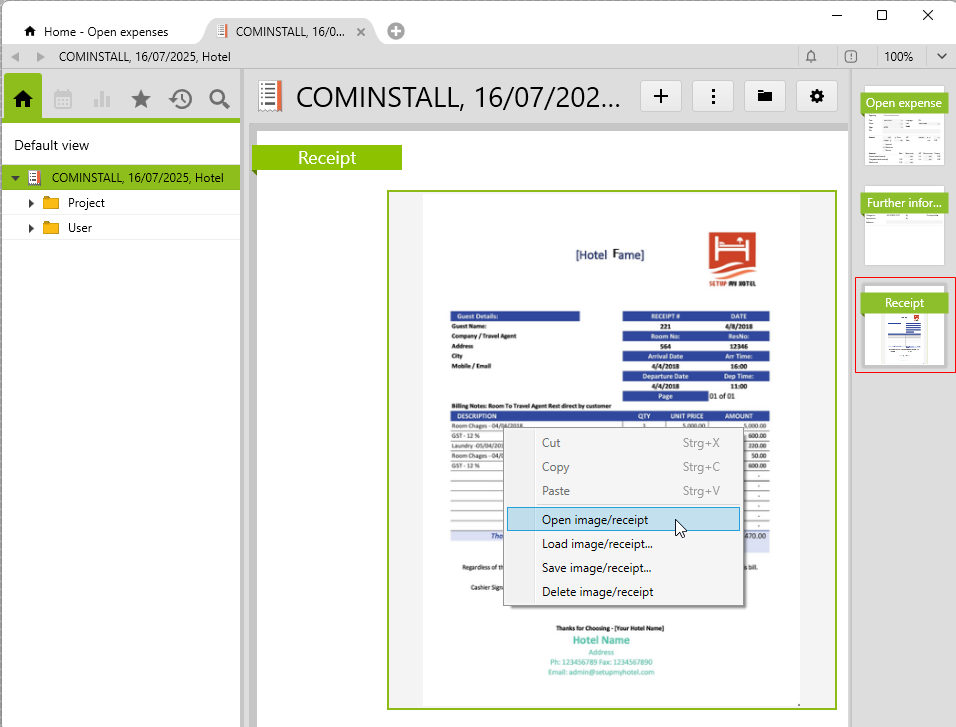
Save receipt
On the Receipt page, you can store an image by right-clicking > Load image/receipt.... The stored image can be opened, saved and deleted as required. As of Vertec 6.4, PDF files can also be saved. A preview of the first page is shown on the Receipt page. The document can be opened by right-clicking on the preview:
Note: With the delivery of Document sealing, expense receipts can be sealed (from version 6.8.0.16).
Automatic receipt recognition
With the licensed module Procurement & Purchases from Vertec version 6.7.0.14, the information from expense document images can be read in and entered automatically. Automatic receipt recognition is available in all full-featured apps as well as in the Phone App.
To do this, the system setting Project > Use receipt recognition (additional contract terms) must be activated.
In addition to classic postings and PDF, handwritten expense receipts can often be recognized.
Reading of expense documents
To read an expense document, create a new expense on the desired project.
On the Receipt page, load the receipt via the right mouse button > Load image/receipt…. This triggers automatic receipt recognition, which is why loading takes a short while longer than usual. As soon as the recognition process is complete, the receipt appears and the values are entered on the expense. The date on the receipt is entered as the date.
If not all data could be reliably detected, a message appears:
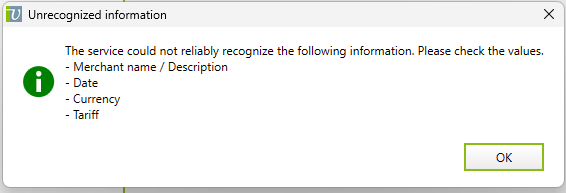
In this situation, you have to enter the missing values manually.
In any case, you should briefly check over the expense entry, because there is no 100% guarantee that everything is always taken over perfectly into Vertec. The responsibility for correct data entry always lies with the customer.
Receipts with multiple VAT rates
If different VAT rates are calculated on an expense receipt, another expense is created for each VAT rate in Vertec. These are linked to the current expense and can be found under follow-up receipts (or, in the reverse case, under original receipt):
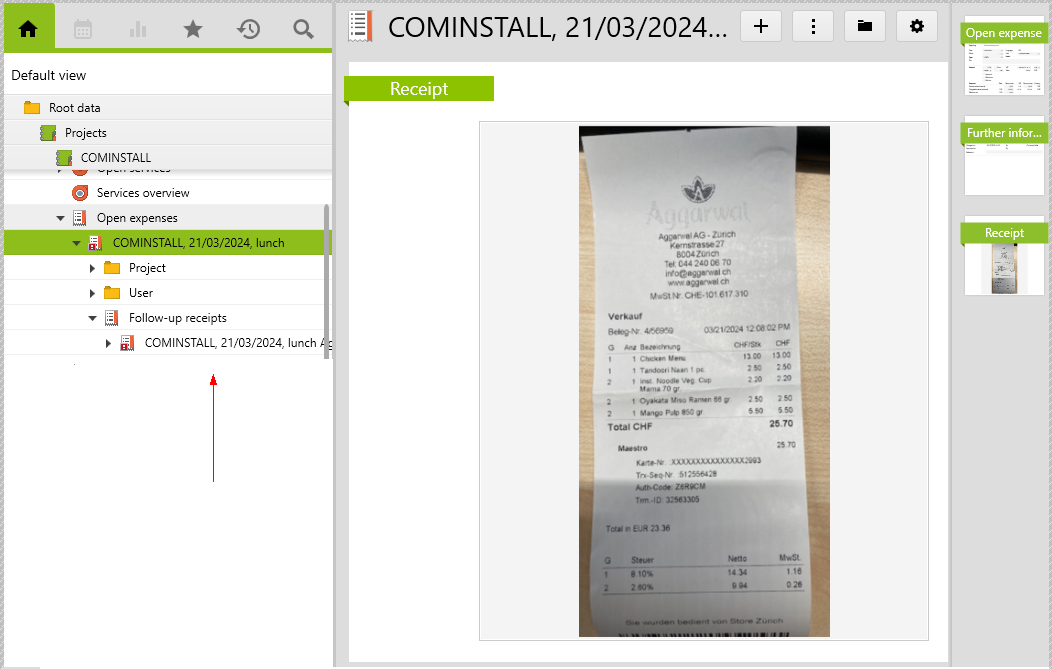
The expense image appears only on the original receipt.
Repeat the recognition process
If an error occurs while reading the expense receipt, for example because there is no server connection, the image is loaded, but the values cannot be recognized. In this case, you can use the Recognize receipt item in the Actions menu for the full-featured apps:
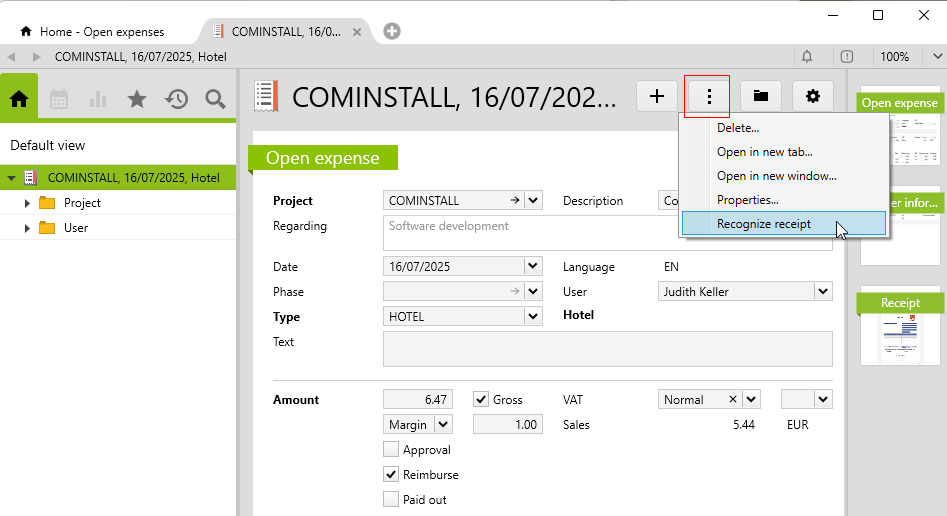
This triggers the receipt recognition again for the receipt that has already been loaded.