
Bexio Web Debtor Extension
 Cloud Suite
 On-Premises
The Bexio Web Accounts receivable extension allows you to post and cancel invoices, transfer addresses and payment imports with Bexio Online Accounting.
In Vertec, navigate to the Settings > Extensions > Extension folder and open the Bexio Web Accounts Receivable extension. Click Installieren.
Some system settings are installed for all accounts receivable interfaces. These are listed in System settings > Accounting.
The following system settings are specific to the Bexio Web accounts receivable extension:
Bexio Access TokenOnly available if the Bexio extension was already in use in Vertec before 6.8.0.18. As of Vertec 6.8.0.18, this setting is no longer taken into account. If an API token is entered here, either add it to the new system setting Bexio Personal Access Token and remove it from this field, or change the login to OAuth (see Bexio pat use login). PropertyName: |
Bexio Application IDAs of Vertec 6.8.0.18 for logging in from Vertec to Bexio via OAuth. When you Register Vertec with Bexio as an app, you will receive a client ID for the Vertec app in Bexio. Insert it here. PropertyName: |
Bexio Application SecretAs of Vertec 6.8.0.18 for logging in from Vertec to Bexio via OAuth. When you Register Vertec with Bexio as an app, you will receive a client secret for the Vertec app in Bexio. Insert it here. PropertyName: |
Bexio use PAT loginAs of Vertec 6.8.0.18. Control the way of logging in to Bexio:
PropertyName: |
Bexio Personal Access TokenVertec 6.8.0.18. In case of authentication via OAuth (recommended), this field can be left blank. If the authentication is done via token, the Bexio API token must be inserted here. This can be generated at developer.bexio.com/pat. This must be done every 6 months, as Bexio API tokens are only valid for this duration. After that, a new token must be generated and entered here. Logging in to Bexio is done as an application, which means that all users have the same user rights when posting, and the same access token is always used. PropertyName: |
Bexio cancellation method
PropertyName: |
Bexio URL for web serviceEnter the URL to the Bexio web service here, usually PropertyName: |
Imprest accountEnter the Imprest Account you have created in Bexio here. PropertyName: |
For Vat types, the corresponding code must be entered from Bexio, e.g. UN81:

The Payment Terms stored in Vertec result in a due date on the invoice. This due date is transferred to Bexio when posting.
Personal account numbers for Bexio can be found in Vertec at the address (customer of the project) under Settings.
If the address in Bexio already exists, enter the corresponding PersonalAcc number here. The address data will be updated each time you post.
If the address in Bexio does not yet exist, it is automatically created when posting and the PersonalAcc number is entered on the address in Vertec.
Only the PersonalAcc numbers on the addresses are taken into account. Any overrides on projects are ignored.
The Vertec Bexio Web Accounts Receivable extension is multi-tenant capable.
To post to more than one tenant, create a Project Type in Vertec for each additional tenant.
If you are logging in to Bexio via OAuth (see Bexio pat use login), enter the client/company name for each project type on the Accounting page under FAR Connection:
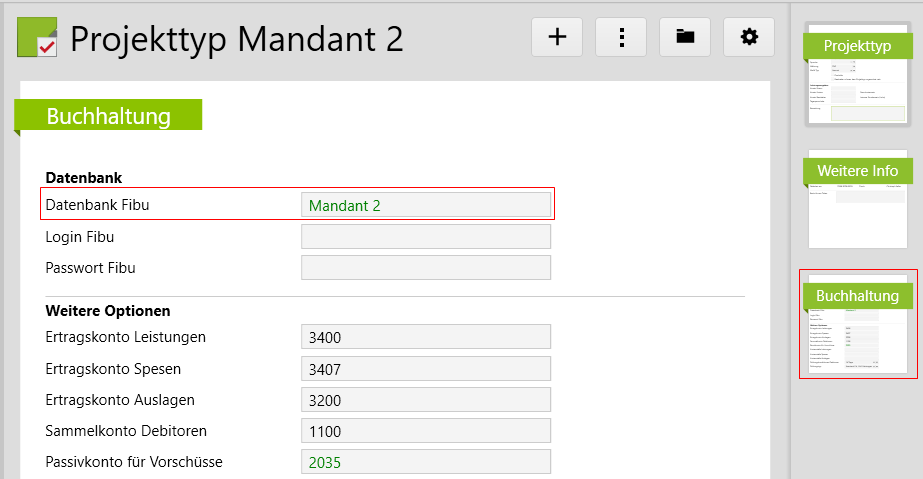
If you log in to Bexio via Personal Access Token (see Bexio pat use login), enter the Personal Access Token for each project type on the More Info page under Bexio Access Token:

Make sure that the accounts on the Accounting page are set up correctly.
All projects assigned to this project type are posted in this client.
Note: Since the personal account number is located on the address (see next section), all projects of a customer must be posted in the same tenant.
If you want to log in to Bexio via OAuth (recommended from Vertec 6.8.0.18 onward), then Vertec must be registered as an app with Bexio.
At idp.bexio.com, add a new app under My Apps.
https://mycompany.vertec-cloud.com/callback, e.g. https://mycompany.vertec-cloud.com/callback.In the same window, you will receive a Client ID and Client Secret, which you can insert in the Vertec System Settings.
In order for Vertec to be able to write the invoice number in Bexio, the checkbox for automatically assigning numbers has to be removed in Settings > All settings > Features and modules > Invoice:

In Bexio, invoice items cannot be posted to asset or liability accounts. To avoid this problem, an imprest account is defined as an income or expenditure account:

In order for invoices to be posted, they must be charged in Vertec.
Charging and posting can be done in one step if the system setting Beleg direkt buchen (System settings > Accounting) is set to Ja.
Posting is done on a single invoice or a list of invoices via the Actions menu or right-click > Posting.
On individual invoices, the booking process can also be performed via the button Stornieren on the page Accounting.
When posting, the addresses or address changes are transmitted (see section Personal Personal Accounts).
The invoice number is transferred from Vertec as the invoice number (see section
Turn off automatic invoice number).
For invoices to be cancelled, they must already be posted.
You can cancel on an individual invoice or a list of invoices via the Actions menu or right-click > Cancel.
On individual invoices, the booking process can also be performed via the button Stornieren on the page Accounting.
Depending on the Cancellation Method set, the invoice in Bexio will be cancelled set or removed from the invoice list (see method description).
The payment import is done as described in the article Payment import with vertec.