Phone App: Bedienung und Verwendung
Bedienung und Verwendung der Vertec Phone App
Betriebsart
Module
CRM, Leistungs- und Spesenerfassung
Die Installation der Vertec Phone App ist im Artikel Phone App: Installation und Konfiguration beschrieben.
Phone App starten
Ein Klick auf das Vertec Icon startet die Applikation.

Das Hauptmenü lässt sich oben links öffnen und enthält folgende Punkte:

Leistungen und Abwesenheiten
Der Menüpunkt Leistungen und Abwesenheiten wird standardmässig angezeigt, wenn die Phone App gestartet wird. Markiert ist der heutige Tag, dargestellt durch den hellen Kreis. In diesem Menüpunkt können Leistungen, Präsenzzeiten und Abwesenheiten erfasst werden. Die verschiedenen Tabs lassen sich in der unteren Navigationsleiste aufrufen:

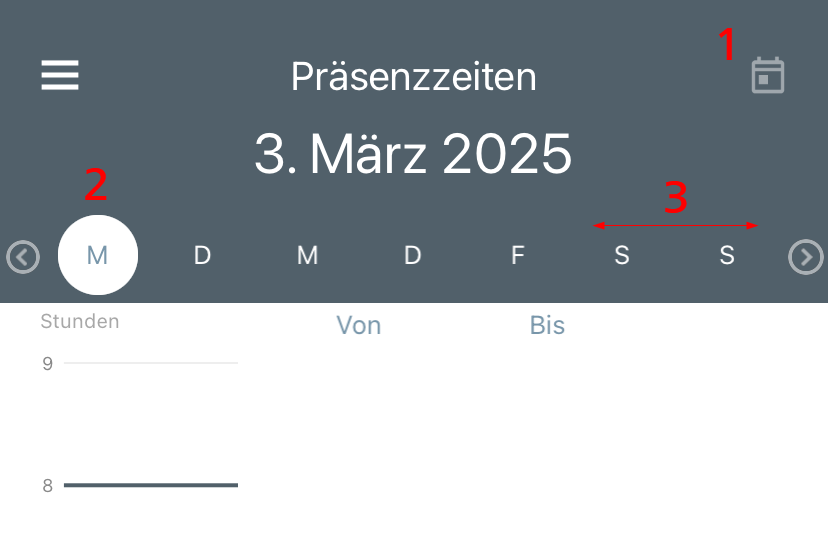
Die Auswahl des Datums kann im oberen Bereich gesteuert werden. Via Klick auf das Kalender-Icon (1) springt die Ansicht auf den heutigen Tag. Unterhalb des Datums kann der gewünschte Wochentag ausgewählt werden (2). Der gesamte obere Bereich lässt sich auf beide Seiten swipen, womit die Woche verschoben wird (3).
Leistungserfassung
Die Ansicht der Leistungserfassung teilt sich in zwei Bereiche.
Links werden die Präsenzzeit (ausgegraut) und rechts die erfassten Leistungen (unterschiedliche Farbe pro Leistung) in Form von Säulen dargestellt. Darunter befindet sich die Summe der erfassten Zeiten für den aktuellen Tag (1). Der dunkelgraue Strich im Diagramm zeigt die Sollzeit des jeweiligen Tages (2). Ein allfälliges Info-Icon signalisiert eine Abwesenheit für diesen Tag.
Rechts werden die erfassten Leistungen inkl. Phase, Tätigkeitscode und Text aufgelistet. Daneben kann der Timer – falls unter Systemeinstellungen > Projekt > Show timer for services entry aktiviert – via Button gestartet und pausiert bzw. beendet werden.

Mit dem + Button kann eine neue Leistung erfasst werden:

Die neue Leistung wird in der Liste jeweils zuunterst aufgelistet.
Präsenzzeiterfassung
Wie auch in der Leistungserfassung enthält die Ansicht der Präsenzzeitenerfassung ein Säulendiagramm, sowie eine Auflistung der erfassten Präsenzzeiten. Im Gegensatz zur Leistungserfassung ist die linke Säule (Präsenzzeit) dunkel-grau und die rechte Säule (Leistungen) ausgebleicht:

Es stehen die Felder Von, Bis und ein Löschen-Button zur Verfügung.
- Kommt erstellt einen neuen Präsenzzeiteintrag und fügt die aktuelle Uhrzeit in das Von-Feld ein.
- Geht trägt die aktuelle Uhrzeit in das Bis-Feld ein und schliesst den Eintrag mit der resultierenden Dauer ab.
Hinweise: Der Tab Präsenzzeit wird nur angezeigt, wenn die Systemeinstellung Präsenzzeitenliste für Leistungserfassung anzeigen aktiviert ist. Optional kann ein Kommt/Geht Button via Systemeinstellung Kommt/Geht für Präsenzzeiterfassung anzeigen ein- und ausgeblendet werden.
Abwesenheiten erfassen
Abwesenheiten werden pro Tag aufgelistet und enthalten Grund, Dauer und Beschreibung der Abwesenheit. Inakti-ve bzw. nicht freigegebene Abwesenheiten sind entsprechend gekennzeichnet.
Mit einem Klick auf eine einzelne Abwesenheit, wird diese in der Detailansicht geöffnet. Mit dem + Button werden neue Abwesenheiten erfasst. In der Detailansicht können folgende Felder ausgefüllt werden:

Spesen
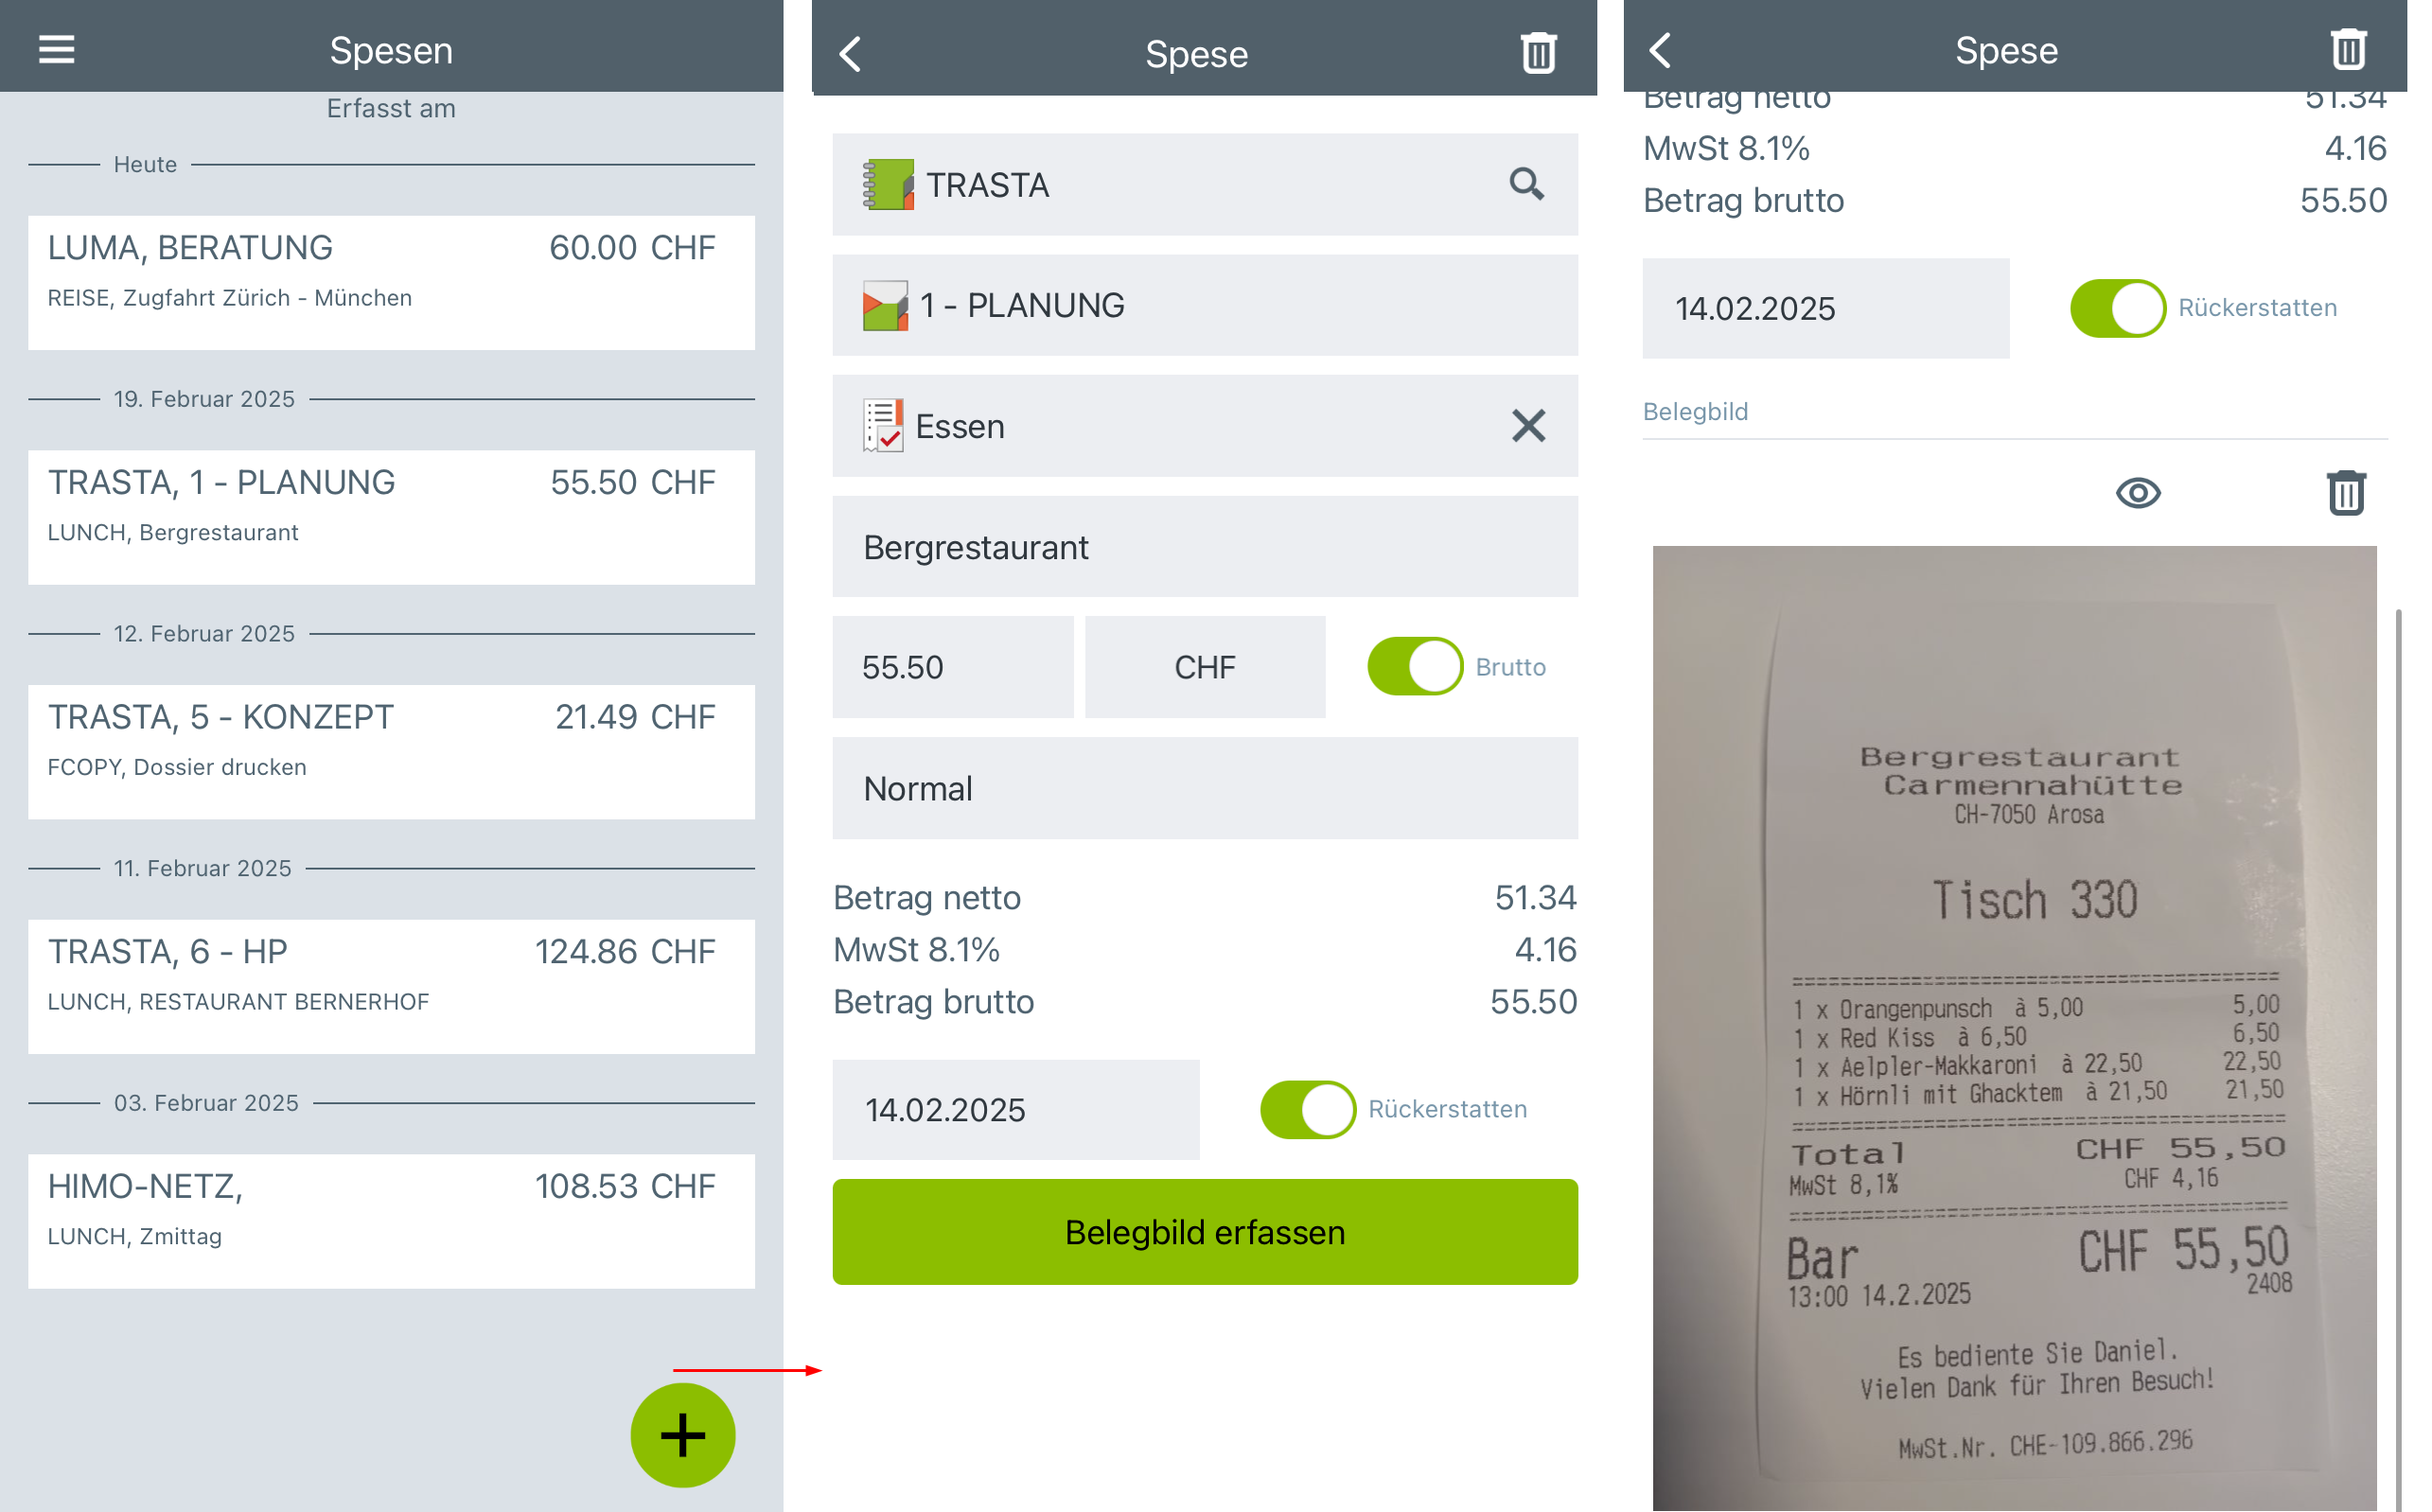
Spesen lassen sich im eigenen Menüpunkt Spesen erfassen. Der Aufbau der Datums- bzw. Wochentagsansicht ist gleich wie bei der Leistungserfassung. Die erfassten Spesen werden nach Datum gruppiert aufgelistet und zeigen Projekt, Betrag, Typ und Text an.
Mit einem Klick auf die einzelnen Einträge lassen sich diese in der Detailansicht öffnen und der + Button öffnet ein neuer Speseneintrag. Neben Projekt, Phase, Typ, Text, Anzahl/Betrag (inkl. Auswahl der Währung) und Datum lassen sich die Optionen Brutto und Rückerstatten aktivieren bzw. deaktivieren sowie ein MwSt-Typ auswählen. Per Button lässt sich ein Belegbild erfassen, wobei direkt ein Foto gemacht oder ein vorhandenes Foto aus der Galerie geladen werden kann. Via Icons lässt sich das Belegbild anschliessend öffnen oder löschen.
Automatische Erkennung von Spesenbelegen
Mit lizenziertem Fremdkosten Modul können Informationen aus den Spesenbelegen gelesen und automatisch ein-getragen werden.
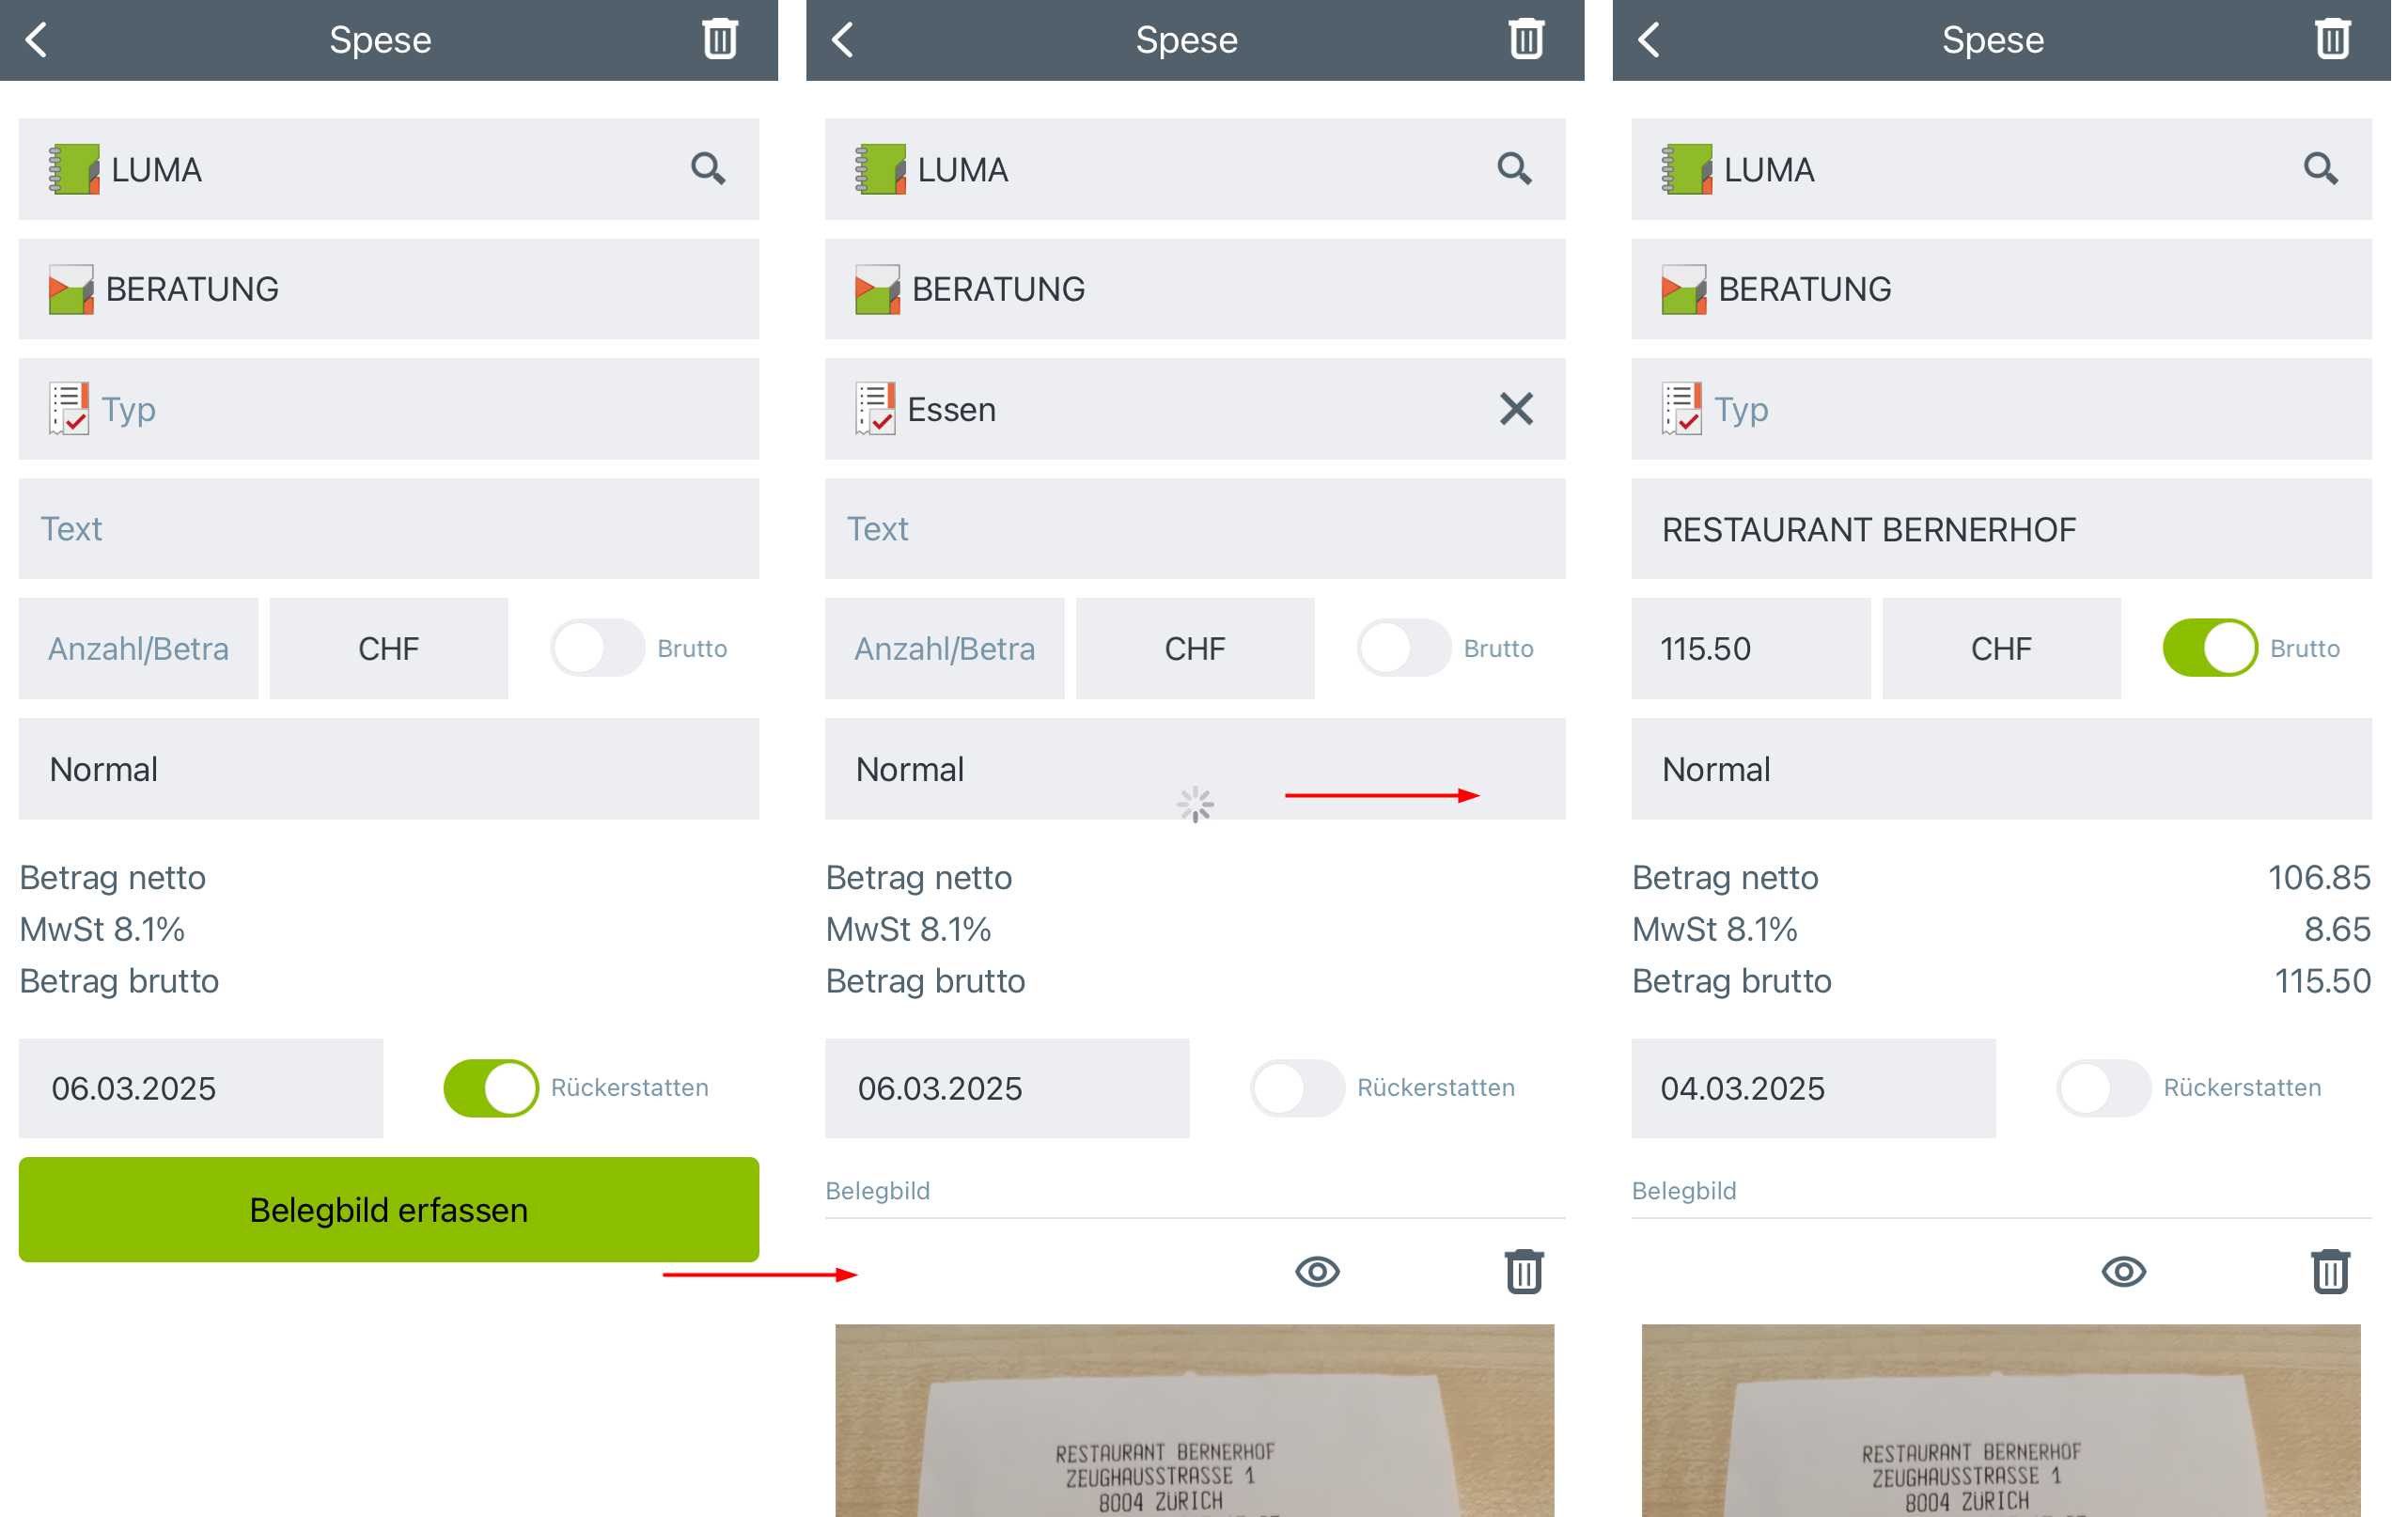
Dafür muss die Systemeinstellung Belegerkennung verwenden (zusätzliche Vertragsbedingungen) aktiviert sein. Sobald ein Beleg gewählt oder fotografiert wurde, wird die automatische Belegerkennung angestossen, weshalb das Laden einen kurzen Moment länger dauert als gewohnt. Der Beleg kann auch via "Senden an"-Funktion an die Vertec Phone App geschickt werden, wobei eine neue Spese erstellt, das Dokument darauf gespeichert und die automatische Belegerkennung angestossen wird.
Wenn die automatische Belegerkennung abgeschlossen ist, wird das Belegbild angezeigt und die Werte werden eingetragen. Werden verschiedene MwSt-Sätze berechnet, wird pro MwSt-Satz eine weitere Spese erzeugt. Das Belegbild wird nur auf dem Original Speseneintrag angezeigt. Die Folgebelege finden Sie in der Liste des entsprechenden Tages (siehe Sortierung in der Spesenliste weiter unten).
Falls nicht alle Daten zuverlässig erkannt werden konnten, erscheint eine entsprechende Meldung. In diesem Fall muss der Speseneintrag kontrolliert und die fehlenden Werte manuell eingetragen oder die Belegerkennung in einer full-featured App erneut angestossen werden.
Der Speseneintrag mit dem Beleg erscheint nach dem Laden in der Phone App auch unmittelbar in den full-featured Apps, da ein Push von der Phone App in die full-featured Apps stattfindet.
Sortierung in der Spesenliste
Die Spesen werden durch die Belegerkennung auf den Tag datiert, der auf dem Beleg vermerkt ist. Damit würden heute geladene Spesenbelege direkt aus der Spesenliste verschwinden, weil sie an dem Tag einsortiert werden, auf den sie datiert sind. Deshalb wurde die Spesenliste so angepasst, dass nicht nur Spesen mit dem selektierten Datum angezeigt werden, sondern auch Spesen, die an diesem Tag geladen wurden.
Adressen
Im Menüpunkt Adressen kann nach Adresseinträgen gesucht werden. Die zugehörigen Aktivitäten, Opportunitäten (falls aktiviert), Projekte und Kontakte können in den jeweiligen Tabs (2) eingesehen und bearbeitet werden.

In der Suche (1) kann nach Firma, Kontakt oder Alle gesucht werden. Unter der Suche werden standardmässig die betreuten Adressen aufgelistet. Dies lässt sich via Systemeinstellung (siehe weiter unten) anpassen.
Das Resultat der Suche ersetzt die Liste der betreuten Adressen. Mit einem Klick auf den gefundenen Eintrag wird dieser in der Detailansicht geöffnet. Unterhalb der Anzeige von Firma oder Kontaktperson können via Pfeil die möglichen Kontaktarten bzw. Kommunikationsmittel (3) geöffnet werden, die direkt über diese Ansicht angewählt und damit ausgelöst oder kopiert (4) werden können. Unterhalb der Kommunikationsmittel werden zusätzliche Adressinformationen (Betreuer & Bemerkung) angezeigt.

Aktivitäten und Opportunitäten lassen sich bearbeiten, Projekte und Kontakte nur anzeigen.
Systemeinstellung für die Adresssuche
Bei der Suche nach Adressen werden standardmässig die betreuten Adressen des Benutzers angezeigt. Dies lässt sich via Systemeinstellung "Betreute Adressen in Phone App anzeigen" in der Section CRM/Aktivitäten anpassen. Wird die Checkbox deaktiviert, bleibt die Liste vor der Suche leer.
Opportunitäten
In dieser Liste werden alle offenen und damit aktiven Opportunitäten angezeigt. Die Reihenfolge ist im Unterschied zu den full-featured Apps wie folgt:
- Wahrscheinlichkeit absteigend
- Geplanter Abschluss, frühstes Datum zuoberst
- Erstellungsdatum, jüngstes zuoberst
Mit einem Klick auf eine Opportunität öffnet sich diese in der Einzelansicht. Via Link (siehe Pfeil) kann direkt zum Projekt navigiert werden.

Der + Button öffnet eine neue Opportunität, auf der folgende Felder definiert werden können: Status und Wahr-scheinlichkeit, Geplanter Abschluss, Beschreibung, Betrag und Währung, Kontakt, Verkäufer und Projekt.

Projekte & Kontakte
Diese Tabs erscheinen nur, falls nach einer Firma gesucht wurde. Es werden alle Projekte des jeweiligen Kunden angezeigt und alle Kontakte in alphabetischer Reihenfolge, für die der eingeloggte Bearbeiter Leseberechtigung hat.
Projekte
Im Menüpunkt Projekte werden – falls vorhanden – die eigenen Projekte des Bearbeiters angezeigt. Analog zu den Adressen gibt es neben der Projektsuche via Lupe einen aufklappbaren Header nach dem Öffnen eines einzelnen Projekts, welcher die Projektdetails aufzeigt.

In der unteren Navigationsleiste befinden sich drei Tabs, welche die dem Projekt zugeordneten Aktivitäten, Opportunitäten und Adressen anzeigen.
Tab Aktivitäten
Die Aktivitätsliste zeigt alle dem Projekt zugeordneten Objekte an.
Tab Opportunitäten
Hier werden alle dem Projekt zugeordneten Opportunitäten angezeigt.
Tab Adressen
Hier werden die dem Projekt zugeordneten Adressen aufgelistet. Mit einem Klick auf eine Adresse wird diese als Einzelansicht geöffnet. Neben den verfügbaren Kommunikationsmitteln werden die Details zur Adresse angezeigt.
Aktivitäten
Im Menüpunkt Aktivitäten können Pendenzen (Offene Aufgaben) und Aktivitäten verwaltet werden.
Im Tab Pendenzen werden alle Aktivitäten angezeigt, welche noch nicht erledigt sind und für die der eingeloggte Benutzer zuständig ist. Die Liste wird nach Datum des Termins sortiert und zeigt pro Pendenz jeweils den Titel, den Typ sowie Projekt und Kontakt an.

Im Tab Aktivitäten in der Liste erhalten Aktivitäten mit angehängten Dokumenten ein entsprechendes Icon.
Mit einem Klick auf die einzelne Pendenz, wird deren Detailansicht geöffnet und – falls vorhanden – eine Vorschau des Dokuments angezeigt (nur bei interner Dokumentspeicherung). Das Dokument kann geöffnet oder gelöscht werden.
Die Icons signalisieren angehängte Dokumente:
|
|
Mit Klick auf das Vorschau-Icon wird das Dokument direkt angezeigt. |
|
|
Das Attachment-Icon signalisiert eine Aktivität vom Typ E-Mail mit Anhang (siehe weiter unten). |
|
|
Nur auf Android Geräten. Das Icon "Externer Link" wird angezeigt, falls ein Dokument abgelegt aber keine Vorschau möglich ist. Mit Klick auf das Icon kann das Dokument mit einer alternativen Applikation geöffnet werden. Hinweis: Wird das Dokument mit einer anderen Applikation geöffnet und darin bearbeitet, werden die Änderungen nicht in Vertec gespeichert. |
Bei Aktivitäten ohne Dokument kann via Button Dokument einfügen eine beliebige Datei aus dem Dateibrowser hochgeladen werden. Mit dem + Button werden neue Pendenzen bzw. Aktivitäten erfasst.

Aktivitätstyp E-Mail
Der Inhalt von E-Mails wird auf den entsprechenden Aktivitäten inkl. Links und Bildern dargestellt. Ist ein Anhang angehängt, wird das Attachment-Icon angezeigt – sowohl in der Liste als auch in der Detailansicht.
Via Pfeil unterhalb des Icons werden die Anhänge aufgeklappt. Mit einem Klick auf die Datei kann diese
- angezeigt oder
- als Aktivität gespeichert
werden.

Dateien an die Phone App senden
Mit Systemeinstellung Dokumentspeicherung Intern können Dateien an die Phone App gesendet werden. Via Senden an-Funktion öffnet sich die Phone App, in der folgende Optionen angeboten werden:
- Als Spesen speichern
- Als Aktivität speichern
Entsprechend der Auswahl werden eine Spese oder Aktivität mit dem Namen der Datei als Titel und dem Dokument als Anhang angelegt. Die Senden an-Funktion funktioniert auch mit PDF-Dateien.

Hinweis: Im Falle von iOS ist die Funktion nur bei Dateien aus dem App "Dateien" möglich.
Kommunikationsmittel LinkedIn
Mit dem Kommunikationsmittel LinkedIn (L) lassen sich LinkedIn Profile von Personen und Firmen via Lin-kedIn Profilname oder LinkedIn URL abspeichern.
Mit einem Klick auf den gespeicherten Eintrag öffnet sich das Profil direkt in LinkedIn, falls der User dort angemeldet ist. Ansonsten öffnet sich LinkedIn mit der Aufforderung, dass sich der User dort zuerst anmelden soll.

In der Phone App lassen sich gespeicherte LinkedIn Einträge öffnen jedoch keine Neuen erfassen.
Einstellungen
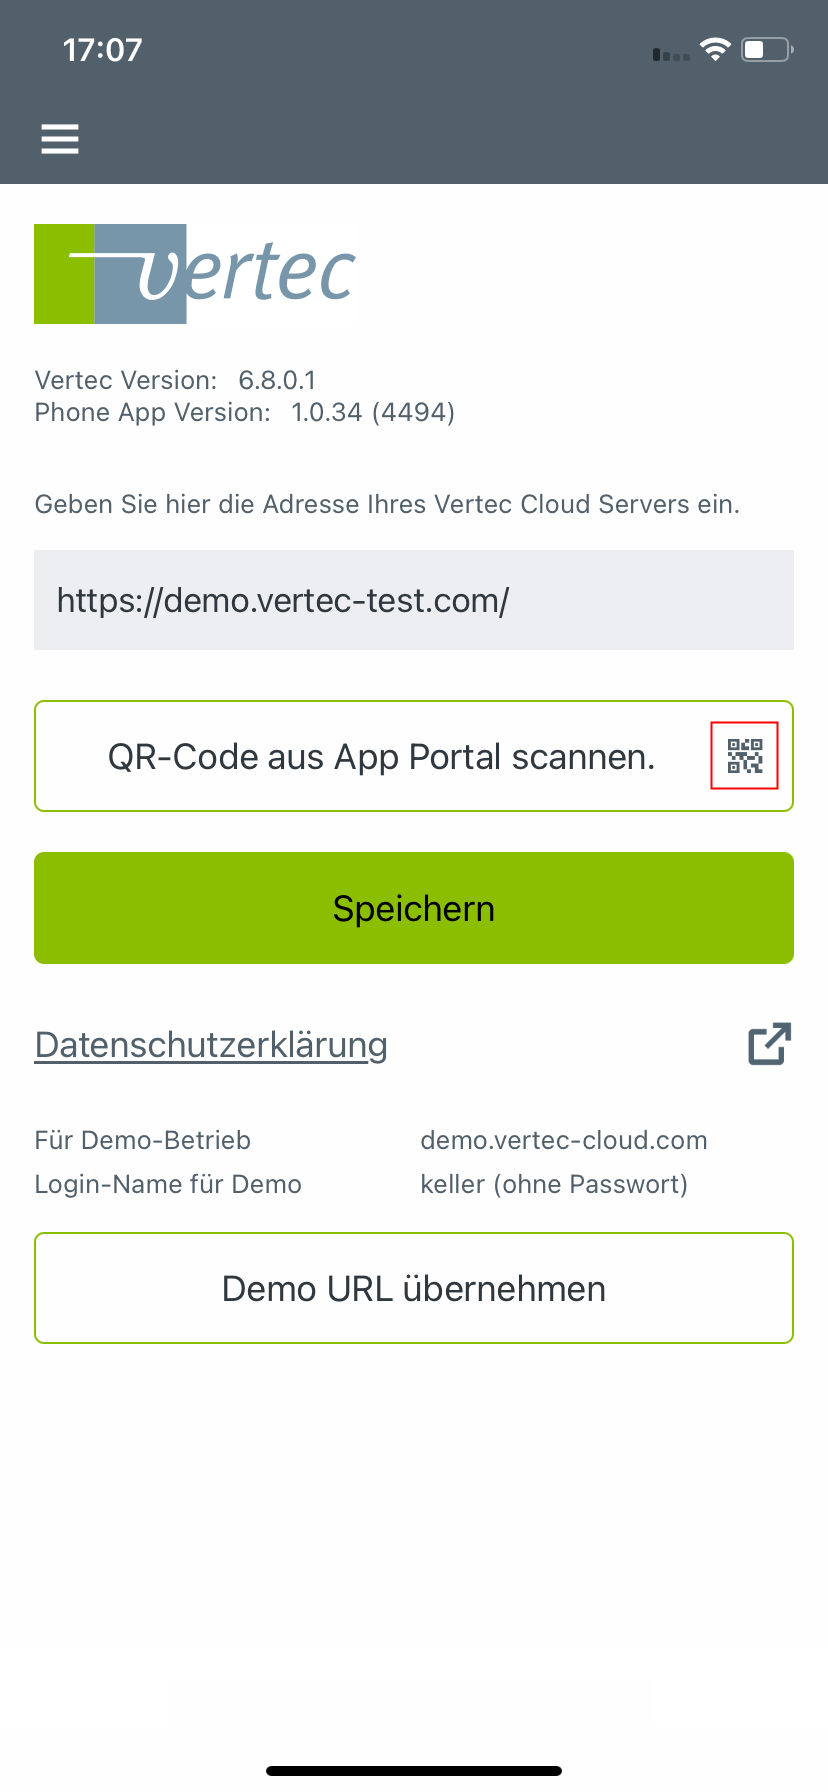
Im Menüpunkt Einstellungen kann die Server Adresse manuell oder via Einscannen des Phone App QR-Codes im Vertec App Portal eingetragen werden.