
A guideline for creating Config Sets.
 Cloud Suite
 On-Premises
Config Sets are XML files that configure or create Vertec objects such as scripts, user rights, evaluations, additional classes, custom field, and link types (custom link type & wrapper link type). This allows automated or specific processes to be deployed as self-contained packages that can be transferred between multiple Vertec systems. Accordingly, additional features are deployed Config Sets that can extend existing Vertec basic functions or add new ones.
But what is the best way to create a Config Set? What are the key steps to keep in mind?
This article describes a best practice for planning and creating Config Sets.
First, it should be clear how and why a Config Set is to be built. The following questions should be clarified and defined in advance:
The goal should be to configure a Config Set as a package with a logically complete feature. That is why overloaded Config Sets that contain a variety of different features should be avoided. Instead, it is a good idea to create several smaller, distinct Config Sets, each covering a specific area of use.
Config Sets are created using the Config Set Builder, where you compile the corresponding objects. When you export the Config Set, an XML structure is automatically created.
Great care should be taken when editing directly in the XML file, as improper changes can damage the XML structure and cause errors when importing the Config Set. You will read more about the Config Set Builder later in this article.
The Web App does not include the Config Set Builder and you cannot compile or edit Config Sets there. To create Config Sets, you have to use the Cloud App.
The proper handling of the entry ID is crucial when creating Config Sets, because it ensures the identification of the data (folders, link types) in the target system. Each object in the Config Set should have an entry ID. This will determine whether an object exists in the target system. Objects without an entry ID are created in the target system, which leads to multiple copies when importing several times. If, however, an object is referenced via an automatically created entry ID in the XML structure and this object is not found in the target system, an error is shown when importing.
Therefore, we recommend that you systematically set the entry ID to the objects. It is best to use the class name combined with an appropriate object name:
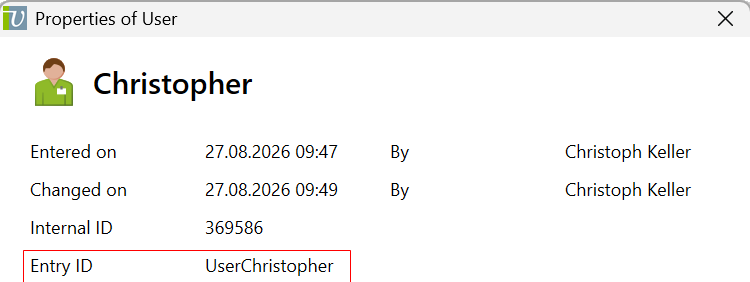
Under no circumstances should the internal ID (numeric value) of the object be used for referencing. The internal ID is automatically assigned once when the object is created and cannot be changed again. This means that the same object has different internal ID's in several databases. Therefore, the internal ID is not suitable for referencing because it does not reliably refer to the same object.
The XML structure is created automatically by using the Config Set Builder when you compile the objects and fill in the other fields, such as Name, Author, Comment, and Elements. The Elements field is used to fill in manually elements for certain specifications. The most important elements are described below:
The requirements element specifies conditions that must be met before the Config Set can be read, detecting potential errors before importing.
True. For example, it can query whether a certain additional class should not be used yet, so that none will be overwritten by the import. Equally important is to define which module must be licensed. An example of this is the Controlling & BI module for BI evaluations.Example:

Changes to existing system settings are also entered in the Config Set Builder in the Elemente field. New system settings must be added directly in the XML file after the first export (see Note on the XML file). The following should be noted for existing and new system settings:
With the sub-element system-settings, which follows the main element settings, the PropertyName is entered under name. The PropertyName can be found in the respective sections of the system settings. This system setting implements the Use spell check check box:
<system-setting name="EnableSpellchecking">True</system-setting>New system settings must be added directly in the XML structure after you have fully compiled the Config Set and exported it once. System settings are identified not by the entry ID, but by their name (PropertyName), and they are inserted directly as objects. There are different property types, which also contain different members.
Below is an example code for the type SelectionProperty, i.e. a system setting with a combobox.
Sample code for a SelectionProperty:
<object class="SelectionProperty" alias="SelectionProperty_0">
<member name="propertyGroup">2</member>
<member name="selectionType">None</member>
<member name="scope">Global</member>
<member name="propertyName">myPropertyElement</member>
<member name="propertyCaption">My property caption</member>
<member name="selectionList">"", "Element 1", "Element 2", "Element 3"</member>
</object>
After completion, import the XML file and export it again, then the system setting remains in the XML file. This step must be performed once.
In the menu Settings > Config Sets...> the Config Set dialog opens. An important note here is the handling of the features Remove and Delete:
Remove: The button to remove causes the Config Set to be deleted, but the objects imported with the Config Set remain in the system. This can happen, for example, if an updated Config Set is reimported and the data should not be deleted. The feature can be executed in the dialog itself or by right-clicking on the Config Set.Delete: The button to delete causes the Config Set to be completely deleted from the system along with all created objects. The feature can only be executed by right-clicking on the Config Set.The New button takes you to the Config Set Builder, where new Config Sets are created. The following fields are included:
Name: Here you enter an explicit name.Author: Here you enter the author of the Config Set.Comment: Here you can enter a free comment text for a more detailed description. We recommend entering the date and possibly a version number.Elements: Here you enter relevant elements such as requirements or settings manually, as described in the section before.Selected objects: Here you add or remove the required objects. You can either use the + and – buttons or drag & drop to add multiple folders. In hierarchical folder structures, the subfolders are automatically included, but the other way around does not work. It is best to transfer the most important root folders, which must have the same entry ID in the source and target system.
List setting |
If, however, only the list setting of an object is required, then select the |
User rights |
User rights must also be added via the parent user group. Individual user rights cannot be imported because this will result in an error message. |
Custom field |
If objects with custom fields are added, the custom field are also exported. Since there is a dependency on the additional class, the custom field definition are only exported if the corresponding additional class also exists in the target system and an entry ID is assigned to the custom field. |
Values in fields |
If the values in fields or even the entire member in the XML structure is deleted, the value will still be shown when the Config Set is imported, so it is not possible to delete the values when creating Config Sets. |
References |
A common import error is missing references. The selected objects in the Config Set are exported and then references to other objects are often created because Vertec objects are linked to each other. Example: If a service is added and the user is not, and the Config Set is exported, then the user’s references are included in the XML structure. Now, if the Config Set is imported in the target system and the same user is not available (same entry ID), an error is returned. Therefore, it is advisable to check the created references in the XML structure and make sure that all referenced objects are available in the target system. |
User |
Adding users should be done with the same care. Here as well, references to all changes made to the objects by the user are exported. These have often nothing to do with the created Config Set. |
Customizing pages |
There can be several class settings per class. An entry ID should also be assigned for this, then the pages will be supplemented accordingly. |
Event scripts |
Created event scripts run as usual after importing the Config Set, which is of course advantageous. Nevertheless, you should have a good overview of which event scripts are running in the target system to avoid a possible overload. |
Once the Config Set is fully compiled, the XML file can be created by clicking the Export button in the Config Set dialog.