
Entering third-party invoices as creditors
 Cloud Suite
 On-Premises
Third-party invoices can be entered in Vertec and assigned to a project. A Creditor is entered for each invoice. If desired, these entries can be transferred directly to accounts payable. Third-party invoices only need to be entered once.
Reimburses expenses to employees. Expense refunds are directly payable.
You can create a creditor via the menu button New > Creditor:

The detail view appears.
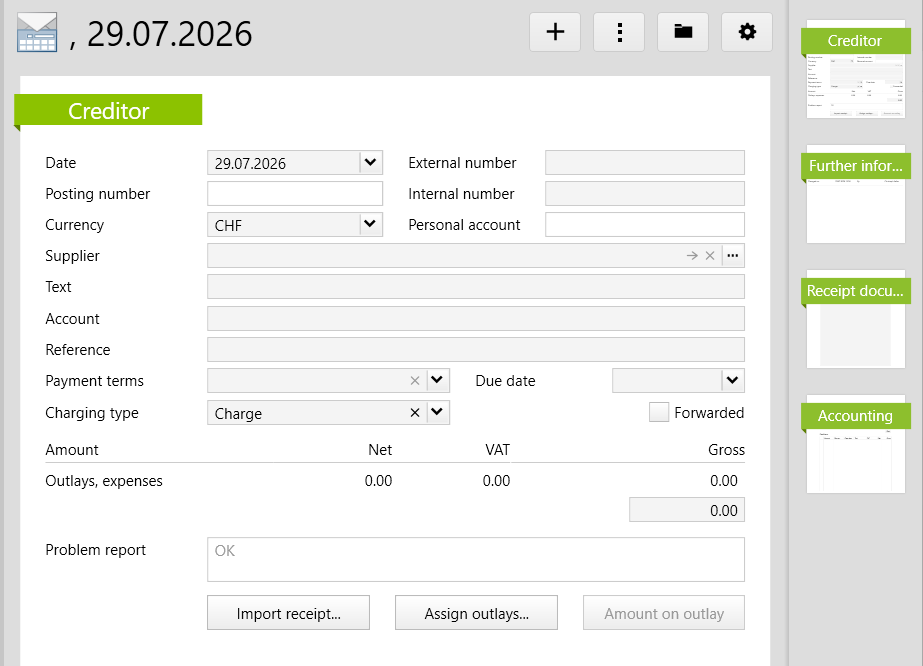
Now you can either enter the values manually or import a receipt.
Click on the button Import receipt.... A file selection dialog appears (or in the Web App an “Upload file” dialog) where you can select the invoice receipt. Support Formats are .pdf, .png, .jpeg, .jpg and from Vertec 6.7.0.16 .xml (utf-8 encoded).
As of Vertec 6.8.0.18. If the system setting Use creditor entry is activated (default), the imported data of the importing receipt are presented in the form of a dialog window. Without automatic creditor recognition, the data are processed according to the section Import receipt (without automatic creditor recognition).
The feature extracts the data from the posting using the following sources, if available:
In the case of automatic creditor recognition, the following dialog window appears after reading the posting:
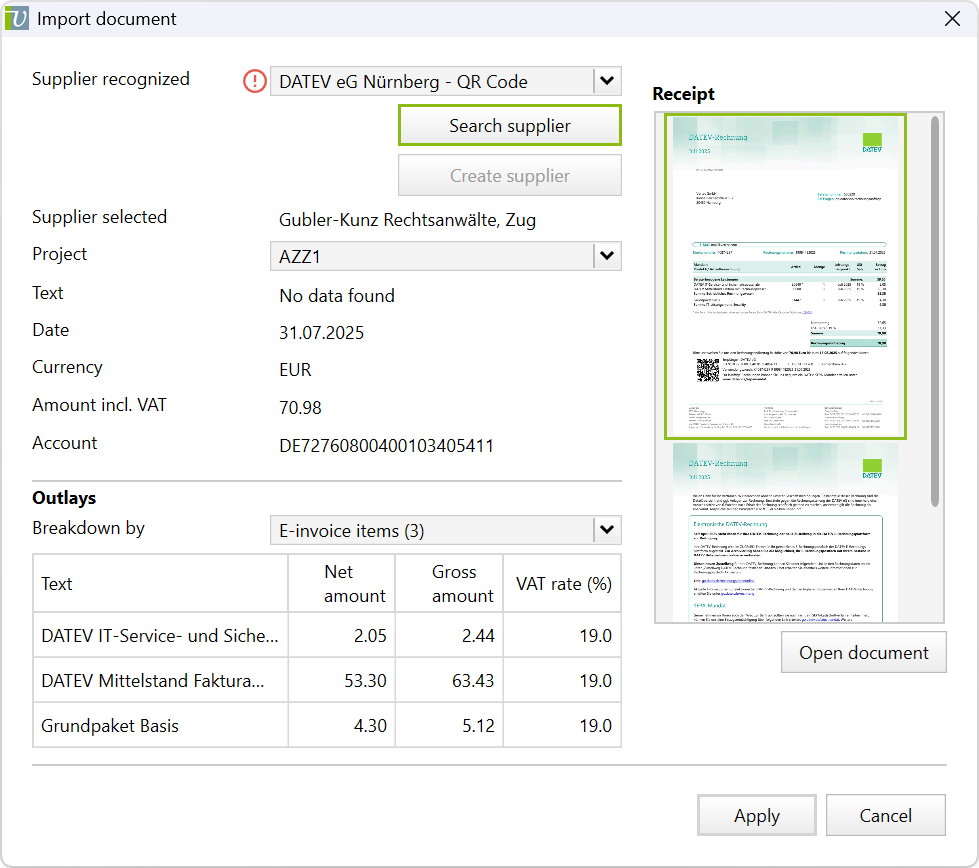
The data found are displayed to the user.
If there is more than one source and the data found differ from each other, the user is provided with a selection. The corresponding fields are marked with a warning icon and the user can select the desired source from the drop-down menu.
If no data is available for a field or postings are imported without a QR code or e-invoices, the text No data found is displayed.
| Field | Description |
|---|---|
Supplier recognized |
If the supplier is found in the address list, it is entered in the field. : If no supplier is found or the user wants to apply to another supplier, this can be done using this button. : If there is no address entry for the supplier yet, it can be created directly via the button. If the supplier is already entered, this button remains deactivated. |
Supplier selected |
If a different supplier has been selected than previously detected by the automation, it will be shown here. |
Project |
Here, the project can be assigned to the creditor. |
Text |
Here, the recognized document text is shown. |
Date |
Here, the recognized document date is shown. |
Currency |
Here, the recognized currency is shown. |
Amount incl. VAT |
Here, the gross amount recognized is shown. |
Account |
Here, the recognized account number is shown. |
Outlays |
In the case of e-invoices, it is possible to select whether and how the invoice lines should be entered as outlays. 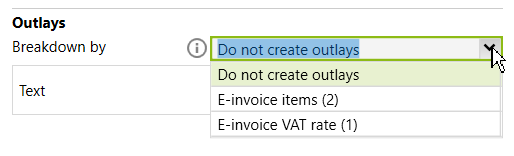 There are the following options
In the system setting Creditor entry: Create outlays (default value), this option can be preset as of Vertec 6.8.0.21. It is then preselected in each case, but can be overridden in the dialog if necessary. |
Receipt |
Here, the imported receipt is displayed. This can also be opened in the editor by clicking the button |
Apply |
With the button Apply, the data is entered definitively in the creditor view. |
It is also possible to reread the same receipt again in order to return to the dialog window. This allows you to adjust the data again. To do this, navigate to the Actions Menu or right-click on the Creditor and select the Reread receipt. The receipt already stored is used and does not have to be selected again. Alternatively, the entire process can be started again via Import receipt....
All data in the creditor will be rewritten. Data that are not present on the receipt will be overwritten as blank. Existing outlays will also be overwritten, unless the Do not create outlays is selected in the dialog. Therefore, we recommend that you first import the receipt and then make manual adjustments in the creditor.
If you only want to replace the receipt without changing any data, then this can be done by Load image/receipt from Vertec 6.8.0.21.
Note: A receipt cannot be reread or imported on posted creditors.
Receipts can also be imported without automatic creditor recognition, but only those with QR code (Swiss QR or EPC QR code), no e-invoices.
If the imported receipt contains a QR code, this information is processed as follows:
Receipt with Swiss QR code |
If the imported receipt contains a Swiss QR code, the following creditor details are automatically entered:
|
Receipt with EPC QR code |
If the imported receipt contains an EPC QR code, the following creditor information is automatically set:
|
Receipt with QR code not supported by Vertec |
If the imported receipt contains a QR code that is not supported by Vertec, the receipt image is saved but no credit data is written (as of version 6.5.0.18). |
Receipt without QR code |
If the imported receipt does not contain a QR code, the existing information remains on the creditor. (In versions prior to 6.5.0.11, the receipt is saved, but no creditor information is entered. Import the receipt first and then fill in all the information, as importing the receipt deletes what was previously entered.) |
If a receipt is imported even though a receipt already exists, a dialog appears asking whether the existing receipt should be overwritten. If yes, all data will be reset for a receipt with a QR code according to the above listing.
You can also fill out creditors manually. These are the fields in the creditor detail view:
Date |
Date of creditor entry. Usually, the date of receipt of the third-party invoice. |
External number |
Open item number of the supplier, i.e. usually the invoice number specified on the third-party invoice. You can search for this number in the root data in the Creditors folder. |
Posting number |
The posting number is generated by accounts payable from the creditor posting and is output here. You can also search for this number in the root data in the Creditors folder. |
Internal number |
This is the number that you want to give to the creditor internally. For example, if incoming invoices are stamped with sequential numbers, this number could be entered here. You can search for the internal number in the root data in the Creditors folder. If the internal number is to be sequential, the use of a number generator can be considered. |
Currency |
Specify the currency of the third-party invoice. The amount is converted accordingly. |
Personal account |
The personal account corresponds to the personal account of the supplier in accounts payable. In Vertec, this value is defined in the supplier address on the Settings page. |
Supplier |
Select the supplier here. This enables you to transfer the creditor entry to accounts payable. By default, the addresses in Vertec that have a creditor personal account assigned to them are available as suppliers. If you wish you can adjust this setting in the system settings via Project > Selection of suppliers only with creditor personal account so that all the addresses are available. |
Text |
Any text that identifies the creditor entry. This text can be written to accounting or used on Office reports. If no text is specified, the text of the first assigned outlay is copied into the Text field. |
Account |
Account or participant number where the creditor invoice is to be paid in. |
Reference |
If required, enter a reference number here. This can be, for example, the reference number on the third-party invoice. If you are working with an external accounting system, the reference number may be limited by that system. For example, in the case of Abacus Web Creditor, the reference number (including spaces) may not exceed 35 digits. |
Payment terms |
Select one of the payment terms defined in the system settings. |
Due date |
This value is calculated based on the payment terms. Alternatively, you can enter a due date manually here. You can show this value in lists or filter in expression folders. |
Charging type |
The charging type determines how to proceed with the creditor item:
The default value for the charge type is determined as follows:
|
Forwarded |
If the Forwarded checkbox is activated, the creditor behaves as if it were posted (without already being posted in accounting). This means:
|
Amount |
Here, you can enter the gross amount (incl. VAT) of the third-party invoice. |
The assignment of the creditor to the project is based on the assigned outlays or expenses. This means that you can also assign outlays and expenses from different projects to a single creditor. This is useful, for example, if you want to distribute the costs of a third-party invoice to several projects of a customer.
Outlays can be entered directly in the folder Outlays of the creditor. Existing outlays can be assigned by drag & drop or via the button Assing outlays... on the creditor.

If you create a new expense or a new outlay on the creditor (using the corresponding icon in the toolbar or via the menu button New), it is assigned directly to the creditor.
Already existing outlays and expenses can be assigned to the creditor via drag & drop.
If there is exactly one outlay, at the same time the amount is written into the outlay and the quantity is set to zero (same functionality as via button Amount on outlay, see below).
Allocated outlays and expenses must meet the following conditions:
If one of these conditions is violated, this will be shown on the creditor in the Problem report field.
The button Amount on outlay is active if there is only one outlay on the creditor. In this case, the purchase price of the outlay can be set via this button.
As soon as several outlays are assigned to the creditor, this button is inactive and cannot be used.
The creditor interface offers the possibility to obtain the client information of the creditor about the projects of the outlays. In this case, it is important that the project does not change in the case of such outlays. To prevent this, there is the system setting Block project assignment of posted outlays and expenses.
On the Receipt document page, a receipt can be loaded via the right mouse button > Load image/receipt....
If there is already a document there, it will be overwritten. Please note the following:
Import receipt... button.With the help of an Accounting extension, creditors can be posted directly into your accounts payable.
The necessary configurations can be found in the respective extension description as well as in the System Settings - Accounting.
Unless otherwise specified in the respective extension description, the opening of an accounts payable address in accounting takes place on the address via the menu button Actions > Accounting > Create new address in accounts payable.
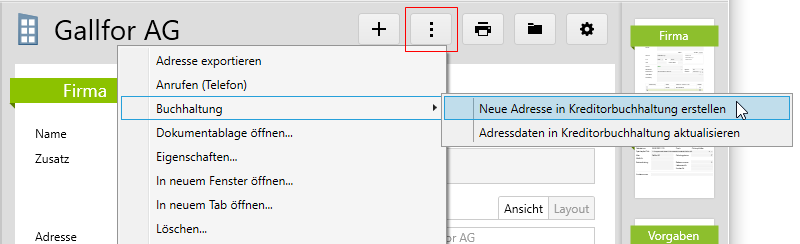
The following information should be entered in Vertec:
Once all the information has been entered correctly, you can post the account payable on the Accounting page. On this page you will also find a detailed list of the postings:
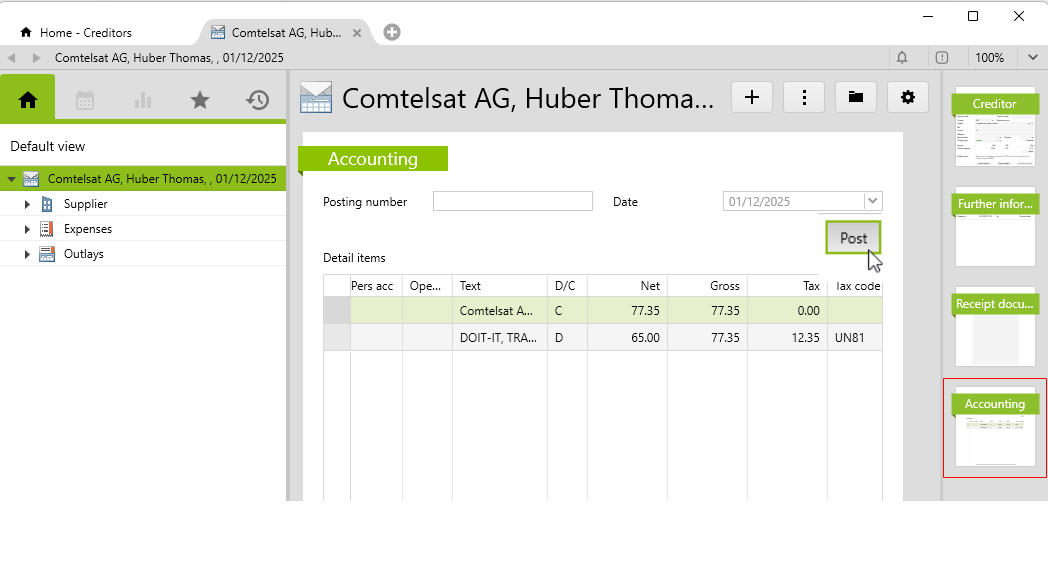
When posting creditors, the VAT code and the VAT rate for the outlay as well as the expense account are fixed.
In some Accounting programs, e.g. in the Infoniqa ONE 50 Creditor Extension, the transfer of an empty collective account allows the use of the FAR’s own configuration. When posting, an empty collective account can also be transferred if this is configured in the accounting program.
In System settings - Accounting, there are two settings:
The texts can be combined with OCL expressions (in % bordered) and plain text.
If these system settings are empty, the following default texts are used:
supplier.asstring, <text of creditor>
You would like to set a creditor to posted in Vertec without transferring any data to accounting. This can be useful, for example, if a account payable should appear as posted in Vertec afterwards, but the accounting period has already completed. Use the Script: set creditor to posted / canceled.