
Combine MailChimp and Vertec optimally
MailChimp is one of the leading providers of email marketing solutions. The Atlanta-based software vendor has established itself through easy-to-use software and excellent customer experiences. Our Vertec marketing team has been satisfied MailChimp users for years. If you are a Vertec customer working with the popular email marketing software, today we will show you how to best combine Vertec and MailChimp.
In this article, you will learn more about:
- Use cases
- Create a Vertec list for newsletters
- Transfer Vertec list to MailChimp
- Processing Feedback from MailChimp
- Create a new list for each newsletter or not?
1. Use cases
An extension between Vertec’s CRM and ERP software and MailChimp does not exist. The combination of Vertec and MailChimp therefore leads via the import of lists. This is easy to implement and is completed in a few minutes. But for which use cases is this method suitable?
As a project-oriented service provider, you would like to inform your customers about news or specialist content on a regular basis. Monthly newsletters, product-related information, Christmas cards or invitations to events are classic use cases for this. For these purposes, the import variant is very well suited, as the data sovereignty lies with Vertec.
Let’s take a look at the necessary steps below:
2. Create a Vertec list for newsletters
Our first milestone is to create a suitable list in Vertec. This mailing list should include all recipients of your planned email or newsletter and contain the following relevant data for each recipient.
- Your e-mail address
- Salutation (“Dear Ms. Müller”) for a personalized address in the newsletter
In addition, almost all data collected in Vertec can be transferred to MailChimp, such as:
- Company, if this is to be mentioned in the email
- Location, if it should appear in the complimentary close (“Viele Grüsse nach Hamburg”)
To create the list in Vertec, we use keywords. How to create and use keyword folders can be found in the Knowledge Base article Folders as keywords.
Here is the compact procedure:
- Right-click on public folders to create a new folder
- For example, use “campaign management” as a designation
- In the For subfolders box, select Contact
- The fields Allow Subfolders and keyword folders must be activated
- With a right click on the newly created folder you can now create subfolders which are the keywords
- Create a subfolder called “Newsletter with MailChimp”
Now you have to “bribe” all relevant contacts, i.e. add the desired keyword. Our sales representative Patrick Ponto shows you how to do this quickly via drag & drop in the following video.

3. Transfer Vertec list to MailChimp
Once the Vertec list is fully configured and populated, the transfer can begin. By clicking on “Transfer list to Excel” you have exported all the data needed for the import to MailChimp.
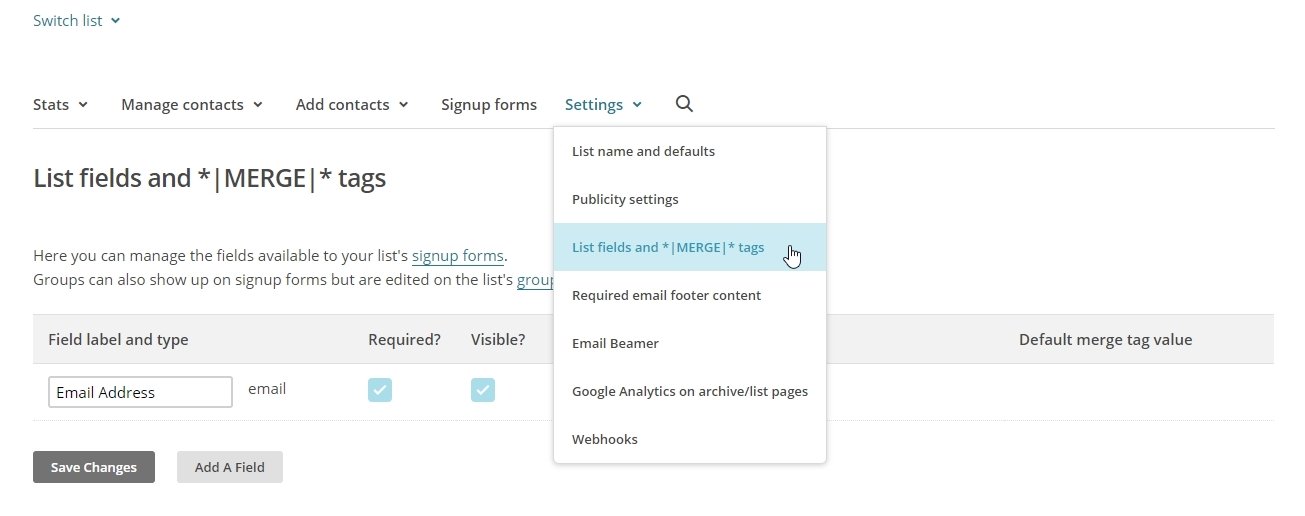
In MailChimp, you need to customize your recipient list (MailChimp: “list”) to match the data from Vertec to the list. The following screenshot shows the overview of all fields (MailChimp: “list fields”) of a recipient list. In our example, only the email address exists.
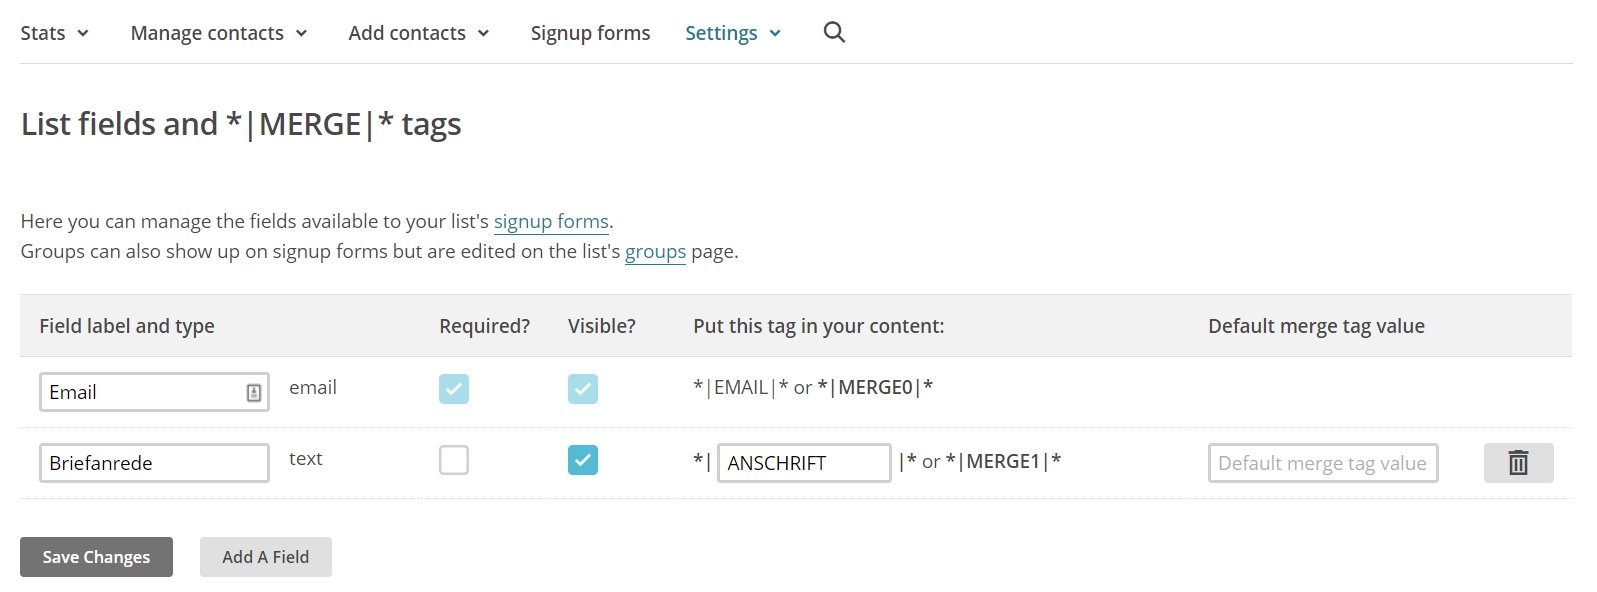
Add the cover salutation from Vertec as a new field:
- Click on “Add A Field”
- Select Text as Type
- Name the field Salutation
- Name the “tag” *| ADDRESS |* to be able to use it in your email template for personal address
Once the fields are configured, you can import your Vertec data into MailChimp:
- In the MailChimp list, click “Add contacts” and “Import contacts”
- Select the option “Copy/paste from file”
- Now copy and paste all relevant data in the Excel list exported from Vertec
The next step is to assign the data to the fields of your recipient list. Simply follow the instructions.
Done! You can now create a campaign in MailChimp and use the new recipient list. MailChimp provides an excellent guide for creating campaigns in its Knowledge Base.
4. Processing Feedback from MailChimp
If the addresses in Vertec are of good quality, there will be a few bounced emails after the newsletter has been dispatched. Here you may want to know why they were not delivered. Does the employee no longer work in-house? Be there a successor? In addition, you may want to ask personally why the recipient does not want to receive your newsletter in the future.
These feedbacks and evaluations can be displayed in various ways in Vertec. The easiest way is to remove the check mark in the corresponding mailing list (keyword folder). If you want to document more information about unsubscribing, you can add another keyword such as “Unsubscribe from newsletter”. Now briefly enter an Activity for the contact, in which you document the date and reason.
5. Create a new list for each newsletter or not?
In our view, reusing the created list as a distribution list for further newsletters from the MailChimp software is suitable for most scenarios.
The benefits at a glance:
- There is no need to create a new list for the next newsletter
- All fields (“list fields”) are retained
- List settings such as “from name” and “from email address” are preserved
- ”Clean” and “unsubscribed” contacts remain in the list with their status, so they will not be contacted if they are accidentally re-imported from Vertec
By the way: MailChimp offers further information on data security, the EU/SWISS Privacy Shield and the DSGVO in its Knowledge Base. There you will also find the template for the so-called “Data Processing Agreement,” which you should conclude.
Do you have any questions or suggestions about using MailChimp with Vertec? We look forward to your comments!



The review package for future-proof Vertec installations


How to Use AI Features in Vertec with Full Sovereignty

Webinar Purchase


Give your Vertec the right flavor
Webinar Additional Features
AI in Vertec: the new LLM Client in Python 3
Update capability and adaptability in Vertec: a technical area of tension

